Safe Lifting After C-Section: 7 Safe Lifting Techniques After a Cesarean Every New Mom Needs to Know

You are at home with your newborn, sore from a C-section, and suddenly every little thing, lifting the baby out of the bassinet, picking up a dropped burp cloth, or even carrying a laundry basket, feels overwhelming.
Here comes the good news. You can absolutely care for your baby and manage your home without hurting yourself or delaying your recovery. With the right techniques, safe lifting after C-section becomes second nature, protecting your incision while keeping you mobile and confident.
In this guide, I’m sharing 7 simple, proven lifting techniques from the log roll for getting out of bed to the half-kneel toddler pickup. You’ll learn exactly how to lift, carry, and move during weeks 1 to 6, plus warning signs that you’ve done too much.
What is safe lifting after C-Section?
Safe lifting after C-section means using proper body mechanics, like squatting instead of bending, keeping your baby or object close to your chest, and pushing rather than pulling – to protect your abdominal incision, avoid hernias, and support healing during the first 6 weeks postpartum.
Why Safe Lifting After C-Section Matters More Than You Think?
Your cesarean section was major abdominal surgery. Even if you feel “fine” after two weeks, the internal layers, uterine muscle, fascia, and sutures, are still knitting back together. Learning safe lifting after C-section isn’t optional; it’s essential.
The real risks of lifting incorrectly
- Hernia: When intra-abdominal pressure pushes tissue through weak abdominal muscles.
- Adhesions: Internal scar tissue that can cause chronic pain.
- Delayed wound healing: Strain pulls on the incision, slowing closure.
- Increased bleeding: Overexertion can restart postpartum bleeding.
General recovery timeline: weeks 1–2 vs. weeks 4–6
- Weeks 1–2: Only lift your baby (plus a glass of water or remote). No laundry baskets, no toddlers.
- Weeks 3–4: Light household items up to 10–15 lbs, using proper techniques.
- Weeks 5–6: Gradually increase to 20–25 lbs if you feel no pain and get doctor approval.
How to listen to your body’s warning signs?
Your body talks. Learn to hear:
- Okay signals: Mild tugging, muscle fatigue that fades within 10 minutes.
- Stop signals: Sharp pain, pulling at the incision, fresh bleeding, dizziness, or increased swelling.

Technique #1: The Log Roll to Get Out of Bed
The first “lift” of the day is your own body. Rolling out of bed incorrectly crunches your abs – exactly what you want to avoid. Safe lifting after C-section starts before you even stand up.
Step-by-step from lying flat to sitting upright
- Lie on your back with knees bent and a pillow under your knees (optional).
- Roll onto your left side, keeping your shoulders and hips moving together, like a log.
- Use your right arm to push your upper body up while letting your legs swing off the bed.
- Pause sitting upright for 10 seconds. If you feel dizzy, wait longer.
Keeping your core neutral and incision relaxed
Imagine a soft pillow between your belly button and incision. Don’t let your stomach “tent” upward. Breathe out as you push up.
Using your arms, not your abs
Your arms and the bed’s edge do the work. If you feel a crunch in your lower belly, you’re using abs – roll back and try again with more arm strength. Keep a sturdy chair next to the bed. Roll onto your side, then push up from the chair’s armrest instead of the mattress – much easier on your incision.

Technique #2: The Squat Lift for Low Objects
Dropped your phone? The TV remote? A pacifier under the couch? The squat lift is your best friend for safe lifting after C-section.
Proper squat form without engaging lower abdominals
- Stand with feet shoulder-width apart, toes pointed slightly out.
- Keep your back straight, chest lifted, and lower your hips as if sitting back into a low chair.
- Go only as low as comfortable, you don’t need your bottom to touch your heels.
- Exhale as you stand up. Holding your breath increases pressure on your incision.

Technique #3: The Brace-and-Hug for Baby Lifting
Lifting your newborn is non-negotiable and it can be done safely, even during the first week, with proper safe lifting after C-section technique.
Lifting newborn from bassinet or floor level
From bassinet (waist-high):
- Stand close, your feet touching the bassinet’s base.
- Place one hand behind baby’s head/neck, the other under their bottom.
- Hug baby tight to your chest before straightening your legs.
- Straighten knees (not your back) to stand upright.
From floor (e.g., tummy time mat):
- Use the half-kneel method (Technique #4) to get low.
- Bring baby to your chest, then use your front leg to push up.
Holding baby close to your chest: why proximity protects your incision
When baby is close, the weight travels straight down through your skeleton instead of pulling on your abdominal wall. A baby held at arm’s length creates 3 to 4x more strain.
Using a nursing pillow as a prop for support
Wear a nursing pillow (like a Boppy) around your waist before lifting. It acts as a buffer against your incision and gives you a little shelf to rest baby on while you adjust your grip.

Technique #4: The Half-Kneel Pickup for Toddlers or Heavy Items
If you have a toddler at home, bless your heart. This technique saves your incision while letting you comfort your bigger baby. It’s a cornerstone of safe lifting after C-section for moms with more than one child.
One knee down, one foot forward, the stable base
- Lower your stronger leg’s knee to the floor (put a folded towel under it).
- Keep your front foot flat on the floor, knee bent at 90°.
- Your back is straight, and your torso stays upright.
Using furniture (couch, chair) to push up from
- Place one hand on a heavy, stable piece of furniture (couch arm, dining chair).
- Bring your toddler close to your chest, have them hug you.
- Push down on the furniture with your hand while pushing up with your front leg.
- Rise to standing without bending forward at the waist.
Safe for lifting a 20 to 30 lb toddler or a heavy diaper pail
This technique distributes weight through your strong leg and arm, bypassing your core. Use it for:
- Lifting a toddler from the floor after a tantrum.
- Picking up a full diaper pail (slide it close to you first).
- Lifting a heavy bag of groceries from the car floor.

Technique #5: The Slide-and-Push for Laundry Baskets & Groceries
Laundry is a sneaky C-section enemy. A full basket that can weigh 15–20 lbs is fine but lifting it from the floor is what causes injury. Safe lifting after C-section means rethinking how you move everyday items.
Why you should never lift a full basket from the floor?
When you bend and lift a basket, your abs contract hard to stabilize your spine. That contraction pulls directly on your healing incision.
Sliding items onto a counter, chair, or table first
- Place the laundry basket or grocery bag on the floor next to a sturdy chair or low table.
- Use your foot to slide it until it touches the chair leg.
- Keeping your back straight, slide the basket up the chair leg onto the seat.
- Now the item is at waist height – you can safely squat or slide it onto your hip.
Pushing instead of pulling reducing core strain
- Push a vacuum cleaner or stroller, your legs do the work.
- Pull a laundry basket across the floor? No, that engages your deep core.
- Instead: Use a rolling cart or slide the basket with your foot.
- You can sort clothes into small mesh bags (3 to 4 lbs each). Carry one bag at a time. It takes longer, but you won’t re-injure yourself.

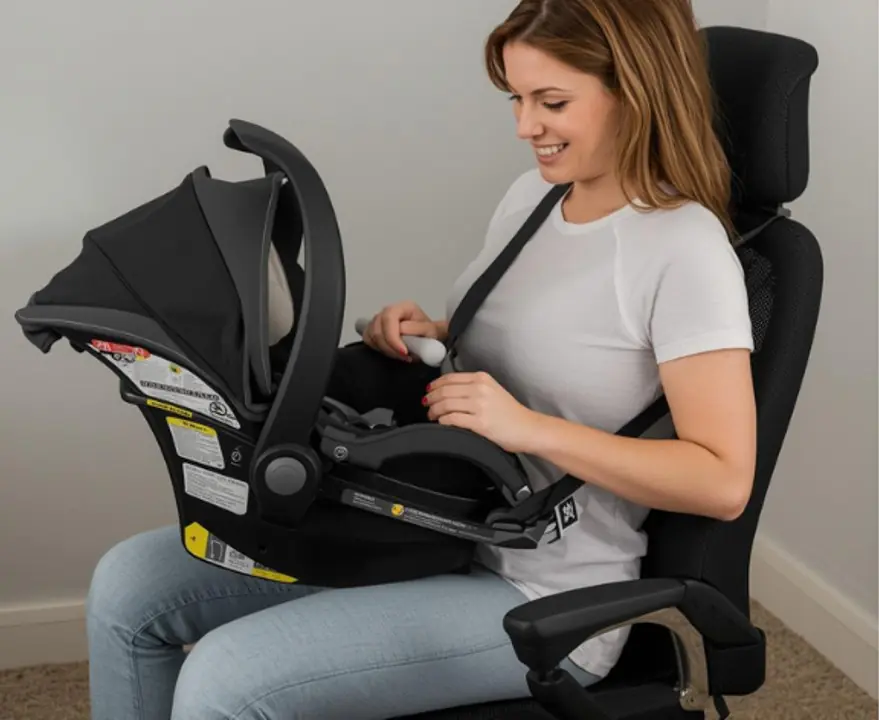
Technique #6: The Chair-Aided Stand for Carrying Car Seats
Car seats are heavy (7–10 lbs empty, plus baby = 15+ lbs). And you have to lift them into cars, onto strollers, and through doorways. This technique makes safe lifting after C-section possible even with bulky gear.
Using a stable dining or rocking chair to push up from seated
- Sit in a sturdy chair that doesn’t wobble.
- Place the car seat on the floor between your feet.
- Hook the car seat handle over your forearm, then hug it to your chest.
- Push up from the chair arms using your arms and legs, not your stomach.
- Once standing, hold the car seat handle with both hands, pressed against your ribcage.
Two-handed carry: Car seat hugged against your ribcage
The closer the weight is to your sternum, the less strain on your incision. Never carry a car seat dangling from one hand.
When to switch to a stroller or ask for help
- First 3 weeks: Use a bassinet stroller attachment or ask your partner to carry the car seat.
- If you feel a burning sensation at the incision: Put the car seat down immediately and switch to a wrap carrier for baby (once cleared by doctor).
- Living alone? Consider a lightweight car seat (like the Cosco Scenera NEXT, under 7 lbs) and install a car seat base that stays in the car so you only lift the seat once per trip.
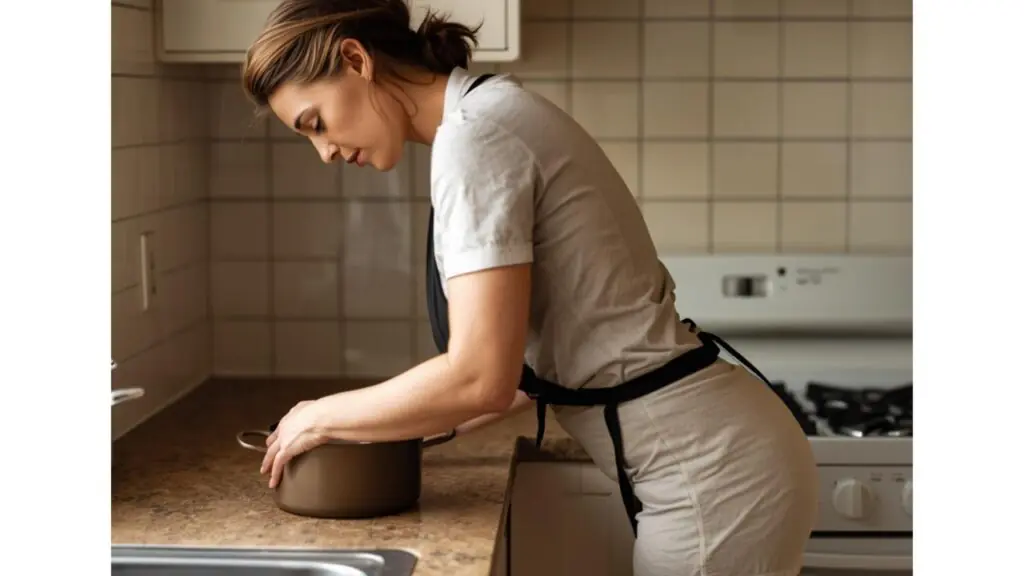
Technique #7: The Wall-Supported Lift for Pots or Heavy Cookware
You still need to eat. But a cast-iron skillet or a full pot of soup can be a C-section nightmare. Even in the kitchen, safe lifting after C-section applies. Place frequently used pots and pans on the counter, not in lower cabinets. Store heavy appliances (stand mixer, slow cooker) on a rolling cart.
Leaning one shoulder against a wall for stability
- Stand next to a sturdy wall (not drywall alone, find a stud or a tiled wall).
- Lean your left shoulder against the wall so your body is at a 45° angle.
- The wall now takes half your body weight, so your core doesn’t have to.
Sliding rather than lifting
- Instead of lifting a heavy pot from the stove to the sink, slide it across the counter.
- Instead of lifting a roasting pan from the oven, pull the rack out and scoop food out with a smaller container.
- Instead of lifting a gallon of milk, pour it into smaller pitchers.
Safe limits: nothing heavier than a half-gallon of milk (≈4–5 lbs early on)
- During weeks 1–2, a half-gallon of milk (4.2 lbs) is your max.
- During weeks 3–4, you can graduate to a full gallon (8.6 lbs) if you use the wall-supported lift.
Signs You’re Lifting Too Soon or Too Heavy
Even with perfect safe lifting after C-section technique, your body may say “no.” Watch for these red flags.
Pain, fresh bleeding, or a sharp pulling sensation
- Pain that makes you gasp: Stop immediately. Rest for 24 hours.
- Bright red bleeding (not spotting): Call your doctor, this can mean internal strain.
- Pulling sensation that lasts more than 10 minutes after lifting: You overdid it.
Increased swelling around the incision
Check your incision every morning. If it becomes puffy, red, or warm to the touch – and you lifted something heavy the day before – you’ve likely torn tiny internal stitches.
When to call your doctor immediately
- Fever over 100.4°F (38°C).
- Foul-smelling drainage from incision.
- Sudden sharp pain on one side of the incision.
- You feel a “pop” followed by severe pain.
Frequently Asked Questions About Safe Lifting After C-Section
Q1: Can I lift my toddler after a C-section? If so, when?
Ans: Yes, but wait until week 6 and get your doctor’s clearance. Even then, use the half-kneel technique (Technique #4) and keep lifts to 30 lbs or less. If your toddler is heavy, teach them to climb onto the couch first so you’re not lifting from the floor.
Q2: How much weight can I lift at 2 weeks vs. 4 weeks vs. 6 weeks?
Ans: Week 1–2: Your baby only (7–10 lbs) + a glass of water
Week 3–4: Up to 15 lbs (e.g., diaper bag, small laundry bag)
Week 5–6: Up to 25 lbs (e.g., toddler, car seat with baby)
Week 6+: Doctor clearance needed before lifting 30+ lbs
Q3: What if I live alone and have no help, realistic alternatives?
Ans: Pre-prep: Before delivery, move everything you need to waist height (dishes, snacks, diapers, wipes).
Use tools: Reacher grabber tool ($10 on Amazon) for dropped items. Rolling carts for laundry. Stool for high shelves.
Accept lower standards: Eat paper plates. Wear the same sweats for 3 days. Your healing is more important than a tidy home.
Ask neighbors or a postpartum doula for 1–2 hours of help.
Q4: Does using a postpartum belly binder make lifting safer?
Ans: A belly binder can help with support and remind you not to bend, but it does not allow you to lift heavier weights. Think of it as a gentle cue, not a shield. And never wear it so tight that you can’t take a deep breath.
Week-by-Week Lifting Action Plan
Here’s a simple calendar to follow. Print it out and put it on your fridge.
Weeks 1–2: Only baby and a glass of water
- Log roll out of bed.
- Squat to pick up a pacifier.
- Brace-and-hug for baby from bassinet.
- No laundry, no vacuuming, no car seat lifting.
Weeks 3–4: Add light laundry (sliding method)
- Slide-and-push for a small laundry bag (5–8 lbs).
- Half-kneel to pick up a toddler if they can help by climbing halfway.
- Wall-supported lift for a half-gallon of milk.
- No full grocery bags, no carrying older child up stairs.
Weeks 5–6: Gradual return to toddler lifting with half-kneel
- Chair-aided stand for car seat (only if pain-free).
- Half-kneel for toddler up to 25 lbs.
- You can now lift a full laundry basket if you slide it onto a table first.
- No heavy gardening, no moving furniture, no lifting older child from the floor repeatedly.
Beyond 6 weeks: Getting clearance from your doctor
Schedule a 6-week postpartum checkup. Ask specifically: “Am I cleared to lift my toddler, a car seat, and 30+ pound objects?” If they say yes, start slowly, one lift, then rest a day, then two lifts.

Conclusion
You didn’t plan on having a C-section. Or maybe you did, but nothing truly prepares you for the reality of lifting your baby while your body stitches itself back together.
The 7 techniques you just learned: the log roll, the squat lift, the brace-and-hug, the half-kneel, the slide-and-push, the chair-aided stand, and the wall-supported lift, are your new superpowers. They turn risky movements into safe lifting after C-section habits that will carry you through recovery and beyond.
Here’s my honest wish for you:
Forget the dishes. Let the laundry pile up. Ask for help a hundred times. And every time you lift your baby, whisper to yourself: “I am healing. I am strong. I am doing this right.” Because you are.
Let’s Stay Connected:
Did one of these techniques save your back (or your incision)? Share this post with another C-section mama who needs it.
Drop a comment below and do read more useful articles from this site: Postpartum Stair Safety Tips, Postpartum Home Hazards, Postpartum Home Care Checklist. I’d love to hear what’s working for you at home.
Disclaimer
This post is for educational purposes. Always follow your doctor’s specific advice and listen to your body. If you have severe pain, bleeding, or incision changes, call your healthcare provider immediately.


2 Responses
[…] read more useful articles from this site: Safe lifting after C-Section, Postpartum Stair Safety Tips, Postpartum Home Hazards, Postpartum Home Care Checklist, and stay […]
[…] this site: Best Resting Positions for Postpartum Healing at Home, Postpartum Stair Safety Tips, Postpartum Safe Lifting Techniques and stay connected for […]